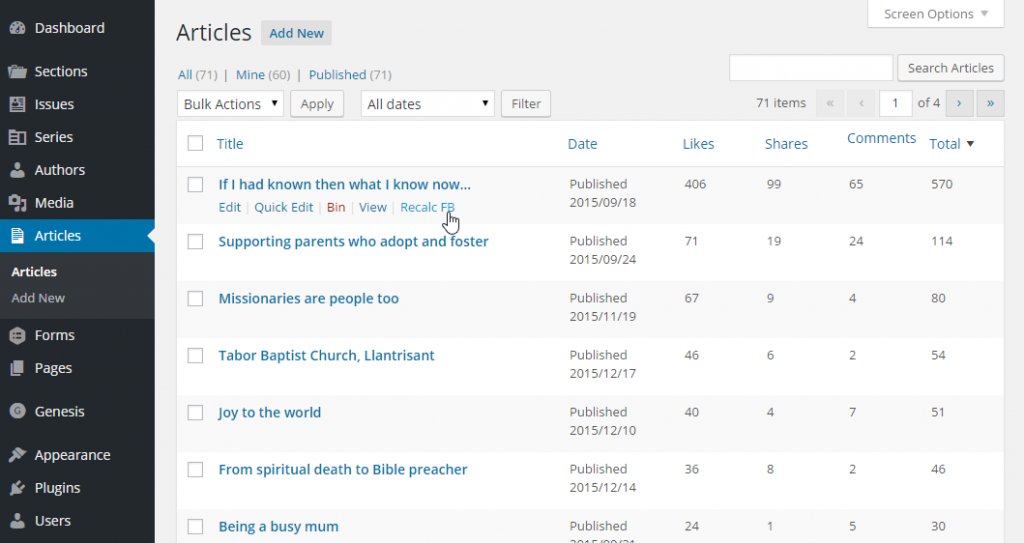
When you’re creating a WordPress site with custom post types, it’s often useful to know how many likes, shares and comments each post is getting on Facebook. There are one or two plugins that will give you this information, but they haven’t been updated in a while, and don’t always work too well. But it’s relatively easy to code your own. Here’s the end result, as seen at the Evangelical Magazine site.:
First, we need to write the function that will actually get the stats from Facebook. Facebook provides a very simple public API that requires no authentication or registration, and it returns the stats in JSON format. I’m storing each stat in a separate entry in post meta (as that makes it easy to sort on, which we’ll need later). But we don’t want the stats cached indefinitely, so each post also has a transient that records whether or not the stats are fresh. The transient will last for up to a week, although it the post is less than a week old, it will only last for a shorter time. With the code below, if the transient is present, we’ll read the stats from the post meta, if it’s not present, we’ll look the stats up from the Facebook API.
    /**
    * Gets the Facebook stats for a given post id
    *
    * @param int $post_id
    * @return array
    *
    */
    public function wcs_get_facebook_stats($post_id) {
        $transient_name = "wcs_fb_valid_{$post_id}";
        $stats = get_transient($transient_name);
        if (!$stats) {
            $json = wp_remote_request('https://api.facebook.com/method/links.getStats?urls='.urlencode(get_permalink($post_id)).'&format=json');
            $stats = json_decode(wp_remote_retrieve_body($json), true);
            if ($stats !== NULL && isset($stats[0])) {
                update_post_meta($post_id, 'wcs_fb_likes', $stats[0]['like_count']);
                update_post_meta($post_id, 'wcs_fb_comments', $stats[0]['comment_count']);
                update_post_meta($post_id, 'wcs_fb_shares', $stats[0]['share_count']);
                update_post_meta($post_id, 'wcs_fb_total', $stats[0]['total_count']);
                $post = get_post($post_id);
                $secs_since_published = time() - strtotime($post->post_date);
                set_transient ($transient_name, true, $secs_since_published > 604800 ? 604800 : $secs_since_published);
                //The transient will last for up to a week. Posts that are fresh will cache their stats for a shorter time than older posts.
            }
        }
        return array (  'likes' => get_post_meta($post_id, 'wcs_fb_likes', true),
                        'comments' => get_post_meta($post_id, 'wcs_fb_comments', true),
                        'shares' => get_post_meta($post_id, 'wcs_fb_shares', true),
                        'total' => get_post_meta($post_id, 'wcs_fb_total', true));

    }
Now that’s done, we can set up all the filters and actions we need. There are quite a few of them, but most of them are pretty simple. I’ll explain each filter/action as we go.
First, we need to tell WordPress which columns to add to which custom post type. For that, we need the manage_edit-{custom_post_type}_columns filter. In this demo, my custom post type is called wcs_article, so the filter is manage_edit-wcs_article_columns. We simply add the elements we need to the $columns array.
add_filter ('manage_edit-wcs_article_columns', 'wcs_filter_columns');

/**
* Adds columns to the Articles admin page
*
* Filters manage_edit-wcs_article_columns
*
* @param mixed $columns
*/
function wcs_filter_columns ($columns) {
    $columns ['fb_likes'] = 'Likes';
    $columns ['fb_shares'] = 'Shares';
    $columns ['fb_comments'] = 'Comments';
    $columns ['fb_total'] = 'Total';
    return $columns;
}
Next, we need to output the content of each column. We do that on the manage_{custom_post_type}_posts_custom_column, which for us is manage_wcs_article_posts_custom_column. The function checks to see whether the post has been published. If it has, it gets the stats, and then outputs whichever variable is required.
    add_action ('manage_wcs_article_posts_custom_column', 'wcs_output_columns', 10, 2);

    /**
    * Outputs the additional columns on the Articles admin page
    *
    * Filters manage_wcs_article_posts_custom_column
    *
    * @param string $column
    * @param int $post_id
    */
    function wcs_output_columns ($column, $post_id) {
        global $post;
        if ($post->post_status == 'publish') {
            $fb_stats = wcs_get_facebook_stats($post_id);
            if (is_array ($fb_stats) && in_array ($column, array ('fb_likes', 'fb_shares', 'fb_comments', 'fb_total'))) {
                echo $fb_stats[substr($column, 3)];
            }
        }
    }
That’s already functional, but the columns we’ve added are too wide. We can add an action to admin_head to fix that. It’s just a single line of CSS.
    add_action ('admin_head', 'wcs_add_styles_to_admin_head');

    /**
    * Adds styling to the admin head.
    *
    */
    function wcs_add_styles_to_admin_head () {
        echo '<style type="text/css">.column-fb_likes, .column-fb_shares, .column-fb_comments, .column-fb_total {width: 10%}</style>';
    }
And that’s actually all that we need to display the stats. You could stop there if you want. But I find it helpful to have the columns sortable, and to do that we need a few more filters and actions. The first filter is manage_edit-{custom_post_type}_sortable_columns, which for us is manage_edit-wcs_article_sortable_columns. The filter receives a list of the columns that can be sorted, and we simply add our columns to the list.
 add_filter ('manage_edit-wcs_article_sortable_columns', 'wcs_make_columns_sortable');

 /**
 * Sets the custom columns to be sortable
 *
 * Filters manage_edit-wcs_article_sortable_columns
 *
 * @param array $columns
 * @return array
 */
 function wcs_make_columns_sortable ($columns) {
     $columns ['fb_likes'] = 'fb_likes';
     $columns ['fb_shares'] = 'fb_shares';
     $columns ['fb_comments'] = 'fb_comments';
     $columns ['fb_total'] = 'fb_total';
     return $columns;
 }
The second part of this puzzle is to modify the WordPress query so that the sort actually takes place. We can do that on the pre_get_posts action. The function will check that we’re in admin mode, and that we’re on the right screen for this custom post type. If we are, and the query contains an ‘orderby’ request for one of our column names, we amend the query by setting the orderby value to meta_value_num onthe appropriate column.
    add_action ('pre_get_posts', 'wcs_sort_by_columns');

    /**
    * Modifies the query to sort by columns, if requested
    *
    * Runs on the pre_get_posts action
    *
    * @param WP_Query $query
    */
    function wcs_sort_by_columns ($query) {
        if  (is_admin()) {
            $screen = get_current_screen();
            if ($screen->id == 'edit-wcs_article') {
                $columns = array ( 'fb_likes' => 'wcs_fb_likes',
                                   'fb_shares' => 'wcs_fb_shares',
                                   'fb_comments' => 'wcs_fb_comments',
                                   'fb_total' => 'wcs_fb_total');
                $orderby = $query->get('orderby');
                if ($orderby && isset($columns[$orderby])) {
                    $query->set ('meta_key', $columns[$orderby]);
                    $query->set ('orderby','meta_value_num');
                }
            }
        }
    }
The code is now complete for adding, displaying and sorting by Facebook stats. The final piece of the jigsaw is the ability to re-check the stats before the cache expires. To do that we’ll add a new action in post_row_actions. The first function filters the existing actions, and adds a new one, which I’ve labelled ‘Recalc FB’. Theoretically, we could just add a query parameter to the URL of the current screen, but the code below also retains several existing parameters, to ensure that after the action we end back in the same place as when we began.
add_filter ('post_row_actions', 'wcs_filter_post_row_actions', 10, 2);

    /**
    * Adds the 'recalc_fb' row action to articles
    *
    * Filters post_row_actions
    *
    * @param array $actions
    * @param WP_Post $post
    * @return array
    */
    function wcs_filter_post_row_actions ($actions, $post) {
        global $current_screen;
        if ($post->post_type == 'wcs_article') {
            $possible_variables = array ('paged', 'orderby', 'order', 'author', 'all_posts', 'post_status');
            $arguments = array('recalc_fb' => $post->ID);
            foreach ($possible_variables as $p) {
                if (isset($_GET[$p])) {
                    $arguments[$p] = $_GET[$p];
                }
            }
            $url = esc_url(add_query_arg ($arguments, admin_url ($current_screen->parent_file)));
            $actions ['recalc_fb'] = "<a href=\"{$url}\">Recalc FB</a>";
        }
        return $actions;
    }
The link is now in place, we just need the behind the scenes work to actually refresh the cache. The code only needs to delete the transient. If there’s no transient, the existing code will be forced to download new data. We should probably beef this up by adding nonces, but as a proof of concept its more than adequate.
add_action ('wp', 'wcs_recalculate_fb_stats');

function wcs_recalculate_fb_stats() {
        if (isset($_GET['recalc_fb']) && is_admin()) {
            $post_id = (int)$_GET['recalc_fb'];
            $transient_name = "wcs_fb_valid_{$post_id}";
            delete_transient($transient_name);
        }
}
And that’s it. It’s rough-and-ready, but does the job pretty well. The one obvious improvement (beyond some security checks) would be to add the option to refresh the cache for all posts, rather than do it one at a time. I’ll leave that task to you :-).